
Goal
Create a simple clone of game called teeter.
Technology
- UIKit for rendering - this game doesn't require any fancy effects.
- Interface Builder for level editing - Keep it simple.
- Chipmunk for Physics - Physics is heavy topic, let's not bother with it in this tutorial.
Analysing
As always you should first look at the problem ahead and think it through, let's do that even with our simple game.
What kind of Actors (objects) do we need for our game and their physical properties?
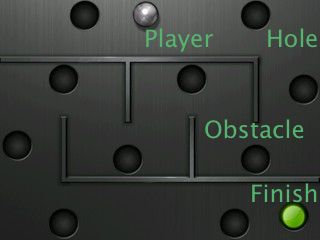
Player - dynamic, circular
- Hole - static, no collisions
- Obstacle - static, quad
- Finish - Static, no collisions
We could express all of them with single set of properties:
- static/dynamic
- circle/quad
- sensor/collider - should it generate collisions or just inform about them
- mass - each dynamic object needs some mass
- momentum - each physical object needs also momentum, but we are better off calculating that from shape and mass of object
- type - needed for recognising between object types
Start coding
I recommend you grab the project from GitHub and read it along with this tutorial, or start fresh by following all steps and filling in missing pieces.
If you don't have an Xcode project yet, create a new one and make sure to enable Storyboards support.
Let's create PhysicalView class that will implement those:
@interface PhysicalView : UIImageView
@property(nonatomic, assign) BOOL isStatic;
@property(nonatomic, assign) BOOL isCircle;
@property(nonatomic, assign) BOOL isSensor;
@property(nonatomic, assign) CGFloat mass;
@property(nonatomic, copy) NSString *type;

- (void)update;

@end
We also added update method, as you will soon learn, most game objects needs to update their state with each display frame. For now just implement it as empty method.
Let's make static body of mass 1 as default (mass doesn't really matter for static bodies, but it's good to setup default value anyway), implement initWithCoder:
- (id)initWithCoder:(NSCoder *)aDecoder
{
  self = [super initWithCoder:aDecoder];
  if (self) {
    _isStatic = YES;
    _mass = 1;
  }

  return self;
}
Levels
Most games consist of multiple levels, let's create LevelViewController that will manage each level. Create new UIViewController subclass, call it LevelViewController then add it to storyboards as well.
Next step is downloading and adding Chipmunk Physics library to our project. Be sure to import "ObjectiveChipmunk.h" on top of PhysicalView and LevelViewController.
Physics
All chipmunk physics is happening inside space, we need to make sure that our level has it's own space, let's limit the space to screen size. In LevelViewController create method called setupPhysics:
- (void)setupPhysics
{
  _space = [ChipmunkSpace new];
  [_space addBounds:self.view.bounds thickness:10.0f elasticity:1.0f friction:1.0f layers:CP_ALL_LAYERS group:CP_NO_GROUP collisionType:nil];
  _space.gravity = cpv(0, 100);

  [self addPhysicalObjects];
}
We create new space, setup it's bounds to match the screen and specify that they should collide for all layers and groups. Then we setup gravity and call addPhysicalObjects method.
- (void)addPhysicalObjects
{
  for (UIView <ChipmunkObject> *view in self.view.subviews) {
    if ([view conformsToProtocol:@protocol(ChipmunkObject)]) {
      [_space add:view];
      }
  }
}
Here we just go over all subviews and we add each subview that conforms to ChipmunkObject protocol to our space.
We need to call our setupPhysics method from viewDidLoad:
- (void)viewDidLoad
{
  [super viewDidLoad];
  [self setupPhysics];
}
We need to make sure our space is updated with each frame, on iOS we can use CADisplayLink, it's an object that allows to bind update functions to screen refresh rate. Let's manage it in viewWillAppear / viewWillDisappear methods:
- (void)viewDidAppear:(BOOL)animated
{
  [super viewDidAppear:animated];

  _displayLink = [CADisplayLink displayLinkWithTarget:self selector:@selector(tick:)];
  [_displayLink addToRunLoop:[NSRunLoop mainRunLoop] forMode:NSDefaultRunLoopMode];
}

- (void)viewWillDisappear:(BOOL)animated
{
  [super viewWillDisappear:animated];
  [_displayLink invalidate];
  _displayLink = nil;
}
Here we basically create new display link when level becomes visible and clean it up when it disappears.
We also need to implement actual tick: method:
- (void)tick:(CADisplayLink *)link
{
 	CGFloat deltaTime = link.duration * link.frameInterval
  [_space step:deltaTime];

  for (id view in self.view.subviews) {
    if ([view respondsToSelector:@selector(update)]) {
      [view update];
    }
  }
}
Here we progress space calculations by stepping it by the difference between current and previous frames. Then we just iterate over all our subviews and update them if they have update method.
Would be nice to see something
We already wrote bunch of code, but we can't see anything yet. We still didn't implement proper methods on PhysicalView, let's fix that. We need to start with setup:
- (void)awakeFromNib
{
  [super awakeFromNib];
  [self setup];
}

- (void)setup
{
  float moment;
  CGFloat width = CGRectGetWidth(self.bounds);
  CGFloat height = CGRectGetHeight(self.bounds);

  if (!_isCircle) {
    moment = cpMomentForBox(_mass, width, height);
  } else {
    moment = cpMomentForCircle(_mass, 0, width * 0.5, cpvzero);
  }

  //! setup physics
  if (_isStatic) {
    _body = [[ChipmunkBody alloc] initStaticBody];
  } else {
    _body = [[ChipmunkBody alloc] initWithMass:_mass andMoment:moment];
  }
  _body.pos = CGPointMake(CGRectGetMidX(self.frame), CGRectGetMidY(self.frame));

  if (!_isCircle) {
    _shape = [ChipmunkPolyShape boxWithBody:_body width:width height:height];
  } else {
    _shape = [ChipmunkCircleShape circleWithBody:_body radius:width * 0.5 offset:cpvzero];
  }

  _shape.elasticity = 0.3;
  _shape.friction = 0.5;

  _shape.sensor = _isSensor;
}
Before creating bodies we need to calculate momentum, we will use Chipmunk helper methods for that.
Then we create physical body and set their position it in level space (our superview). Depending on shape we either create circle or box.
We also need to implement proper ChipmunkObject protocol and update methods:
- (void)update
{
  self.center = _body.pos;
  self.transform = CGAffineTransformMakeRotation(_body.angle);
}

- (NSSet *)chipmunkObjects
{
  if (_isStatic) {
    return [NSSet setWithObjects:_shape, nil];
  }

  return [NSSet setWithObjects:_shape, _body, nil];
}
Here we just set center of our view to match physical body and it's angle. chipmunkObjects needs to return physical objects that are to be added to space, static bodies should not be added.
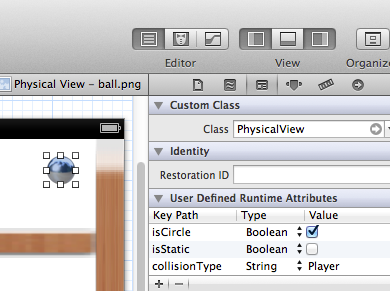
Now go to storyboards, add new UIImageView:
- Set custom class to PhysicalView, make it a square rect
- Set user defined runtime attributes accordingly:
- isCircle - YES
- isStatic - NO
- type - Player
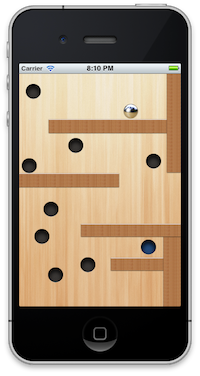
Run project, you should now see player animating and being affected by gravity, not very impressive right?
Copy player view multiple times in IB, put it in different places (set them up so they collide after applying gravity), run it again. That was easy change right? Try changing mass properties and see how it changes animation.
Let's go even further, create new Physical view, set it's size as you see fit, set graphics to our wall.png. No runtime attributes needed, we will use defaults. Run again!
You just added obstacles! It's nice to have flexible level editor, isn't it?
Accelerometer
Static gravity isn't that impressive, let's use our accelerometer to control player. Add this code at the end LevelViewController viewDidAppear method:
UIAccelerometer *accelerometer = [UIAccelerometer sharedAccelerometer];
accelerometer.updateInterval = 1.0f / 30.0f;
accelerometer.delegate = self;
We just setup our level as delegate for accelerometer updates, we still need to implement that method:
- (void)accelerometer:(UIAccelerometer *)accelerometer didAccelerate:(UIAcceleration *)acceleration
{
  [_space setGravity:cpvmult(cpv((cpFloat const)acceleration.x, (cpFloat const)-acceleration.y), 200)];
}
What we do here is very simple, we grab current acceleration from device, multiple it by 200 in each axis and set that as space gravity, this will affect all dynamic objects on scene.
Be sure to run project on device to see acceleration changes.
Game logic
So now we have nice WYSIWYG editor inside IB (more or less), we have good physics along with accelerometer control over it. What's missing is the gameplay of our game, in this game we only have 2 types of actions affecting gameplay:
- Collision with hole - Player loss and we restart game.
- Collision with finish - Player wins and we go to next level.
Before proceeding be sure to create level and setup proper types in runtime attributes, you should only have single player object.
We need to add collision handlers to recognise when player is interacting with those objects, at the end of setupPhysics add:
[_space addCollisionHandler:self typeA:[PhysicalView handlers][@"Hole"] typeB:[PhysicalView handlers][@"Player"] begin:@selector(gameLost:space:) preSolve:nil postSolve:nil separate:nil];

[_space addCollisionHandler:self typeA:[PhysicalView handlers][@"Player"] typeB:[PhysicalView handlers][@"Finish"] begin:@selector(gameWon:space:) preSolve:nil postSolve:nil separate:nil];
Here we add 2 distinct collision handlers, Player vs Hole and Player vs Finish.
Before we compile this change we need to add some code, because typeA and typeB can be any kind of objects they need to be unique (in sense of pointers, not equality), we need some way to map our type strings to unique objects:
In PhysicalView implement this class method:
+ (NSMutableDictionary *)handlers
{
  static NSMutableDictionary *handlers;
  if (!handlers) {
    handlers = [[NSMutableDictionary alloc] init];
  }
  return handlers;
}
at the end of setup method add this lines:
  if (_type) {
    [PhysicalView handlers][_type] = _type;
    _shape.collisionType = [PhysicalView handlers][_type];
  }
This code guarantees uniqueness of strings as objects, we use keys (which check for equality of content) and use type as object. Which means we get exactly 1 object for each matching key.
Going back to LevelViewController as we still need to implement gameLost/gameWon logic:
- (BOOL)gameOver:(cpArbiter *)arbiter space:(ChipmunkSpace *)space
{
  UIAlertView *alertView = [[UIAlertView alloc] initWithTitle:@"You lost!" message:@"I've told you already: You lost!" delegate:self cancelButtonTitle:@"Restart" otherButtonTitles:nil];
  [alertView show];
  return YES;
}

- (BOOL)gameWon:(cpArbiter *)arbiter space:(ChipmunkSpace *)space
{
  UIAlertView *alertView = [[UIAlertView alloc] initWithTitle:@"You won!" message:@"I've told you already: You won!" delegate:self cancelButtonTitle:@"Next level" otherButtonTitles:nil];
  alertView.tag = 1;
  [alertView show];
  return YES;
}

- (void)alertView:(UIAlertView *)alertView clickedButtonAtIndex:(NSInteger)buttonIndex
{
  if (alertView.tag == 1) {
    [self nextLevel];
    return;
  }

  [self loadLevel:1];
}

- (void)nextLevel
{
  [self loadLevel:currentLevel + 1];
}

- (void)loadLevel:(NSUInteger)level
{
  UIViewController *controller = [self.storyboard instantiateViewControllerWithIdentifier:[NSString stringWithFormat:@"Level%d", level]];
  //! looping
  if (!controller) {
    level = 1;
    UIViewController *controller = [self.storyboard instantiateViewControllerWithIdentifier:[NSString stringWithFormat:@"Level%d", level]];
  }
  [self.navigationController setViewControllers:@[controller] animated:YES];
  currentLevel = level;
}
Logic here is very simple, depending on player result we show proper alert and then once user dismisses alert we either restart game or move to next level.
We load levels from storyboards, to make this work you need to setup LevelViewController Storyboard ID to LevelX where X is the level number. Once user finishes all levels we will automatically loop to the first one.
Conclusion
You should now have a simple game, simple level editor and loads of space to improve. What's interesting is that everything has less than 250 lines of code, that's pretty small isn't it ?
What could you do next:
- add spring joint when player collides with any hole (that was actually in tutorial but I've removed that to keep it simpler)
- add nice transitions between levels, instead of going straight to next controller show summary screen with stats (time)
Game graphics by my friend @faktory