
A friend showed me animations from Stripe Checkout and asked: "how could we implement that on iOS?"
Quite simply, Core Animation is very powerful and if one learns how to harness that power, they do not need write a lot of code.
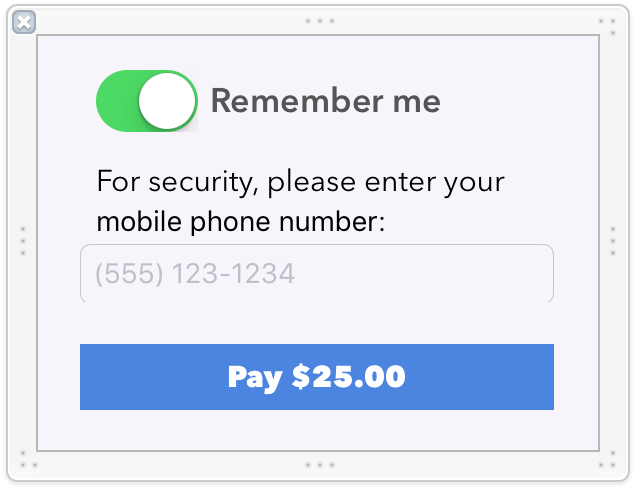
Dissecting different animations
To achieve the above effect, there are 3 different animations that we need to implement:
- Folding / Expanding - When a user selects "remember me", it should grow the view and reveal (unfold) the extra checkboxes.
- Shaking animation - When there is invalid data, we should make it more obvious (adding some red color if we have more than 1 text field is recommended).
- Animating the button state - Instead of introducing extra controls, let's animate our progression in-place inside our submit button.
Common setup
I'll be using 3D transforms to fold and shake, as such we need to introduce perspective distortion.
If we didn't have perspective, objects that are far away in 3D would have the same size as those that are near us, as such it is required to any 3D effects.
In iOS perspective is quite simple, we just need to set m34 inside our CATransform, as Apple states in documentation it's the zDistance of our camera. What I found works pretty well is -1 / 900.0f:
var perspectiveTransform = CATransform3DIdentity
perspectiveTransform.m34 = 1 / -900
self.worksheetView.layer.sublayerTransform = perspectiveTransform
Next we'll define our view, let's call it RememberView. This is how it looks in Interface Builder:
I've divided it into 3 subviews:
- HeaderView - switch + text
- FoldView - containing both the text label and the textfield
- SubmitButton
Folding
To make it fold we will:
- animate the view around the X axis
- place the anchor point to be on top of the view (instead of the default center), so it animates like a hinge.
- make the view single sided so it disappears completely when it's folded.
foldView.layer.anchorPoint = CGPointMake(0.5, 0.0)
foldView.layer.doubleSided = false
Remember you can also set that in IB via runtime attributes.
We'll animate folding using spring animation, because it makes it looks nicer and more natural:
@IBAction func valueChanges(check: UISwitch) {
    UIView.animateWithDuration(0.7, delay: 0, usingSpringWithDamping: 0.7, initialSpringVelocity: 0.2, options: .AllowAnimatedContent, animations: {
        let angle = !check.on ? -90 : 0
        self.foldView.layer.transform = CATransform3DMakeRotation(self.toRadian(angle), 1.0, 0, 0)
        self.layoutStack()
        self.frame.size.height = CGRectGetMaxY(self.submitButton.frame) + 10
    }, completion: nil)
Now about that layoutStack(). Unfortunately AutoLayout doesn't play well with 3D Transforms, but fortunately there is no fancy logic to lay this out manually:
func layoutStack() {
    let margin: CGFloat = 10
    foldView.frame = foldFrame(withTop: CGRectGetMaxY(headerView.frame) - foldView.layer.borderWidth)
    submitButton.frame.origin.y = CGRectGetMaxY(foldView.frame) + margin
}
That's all you need to achieve this effect:
Shaking
To make it shake, we need to:
- Translate on the X axis
- Rotate around the Y axis
- We'll put both in the same animation group for easier management
We could implement that using UIKit, but honestly the keypath animation API is pretty awful for how many steps we want to add here. Instead let's use a simple CAKeyFrameAnimation
let translation = CAKeyframeAnimation(keyPath: "transform.translation.x");
translation.timingFunction = CAMediaTimingFunction(name: kCAMediaTimingFunctionLinear)
translation.values = [-5, 5, -5, 5, -3, 3, -2, 2, 0]
We create a KeyframeAnimation for our translation keyPath (it's pretty cool you can do this instead of creating a whole Transform).
Values are chosen so they go back and forth but settle down to 0.
For rotation we do the same, but need to express angles instead, map is really useful to save us repeating code here:
rotation.values = [-5, 5, -5, 5, -3, 3, -2, 2, 0].map {
    self.toRadian($0)
}
Then just put it into an animation group and set a duration you like:
let shakeGroup: CAAnimationGroup = CAAnimationGroup()
shakeGroup.animations = [translation, rotation]
shakeGroup.duration = 0.6
self.layer.addAnimation(shakeGroup, forKey: "shakeIt"
That's all it takes:
Animating button
A layer content change is animated with transitions. Few people know you can actually use transitions with built-in classes for some pretty cool effects.
The whole idea of animating the button in-place is really cool, and you can do that without any subclassing or other techniques, just the Core Animation API and a few lines of code:
func animateButton(button: UIButton, toTitle title: String, color: UIColor) {
    let transition = CATransition()
    transition.type = kCATransitionPush
    transition.subtype = kCATransitionFromTop
    transition.duration = 0.5
    button.titleLabel?.layer.addAnimation(transition, forKey: kCATransition)
    button.setTitle(title, forState: .Normal)
    button.setTitleColor(color, forState: .Normal)
}
That's really all we need for the final effect:
Conclusion
Core Animation is a powerful tool in your toolbox. Learn how to wield it and can get amazing results with little effort.
Bonus points if you realized that you should not use those colors for button text. They just don't match, and remember that Details Matter!